Online Blog > 01/16/2013 - Correct Tile Shower Construction in Sandpoint, Idaho > Next Entry 01/17/2013
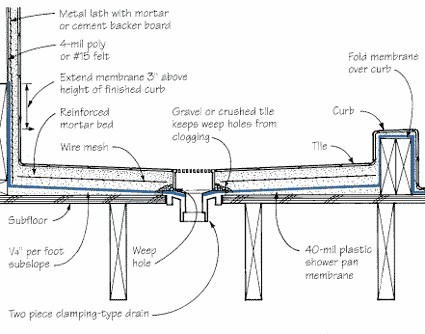
Recently I had a potential customer call because they had a leak in their first floor tile shower with water showing on the ground of their crawl space under the shower. We were involved in a substantial remodel, so I had no time to take on this project. In the meantime, they had a tile contractor diagnose their problem as "cracked grout". That contractor then removed all of the floor grout, including the floor to wall transitions, and they replaced it with an epoxy grout. When I saw this homeowner, they reported success at the repair and were happy with the $900 repair bill. I hate to be the bearer of bad news, but cracked grout in a shower should not cause that shower to leak. Granted, in a properly built shower, you should not have cracked grout. But, the key point is that grout and tile is NOT what makes a shower waterproof. All Portland Cement based grout is not vapor impermeable, nor is it necessarily water impermeable. Even with the best sealers, there will be some vapor or water penetration into the grout somewhere or sometime. Shower waterproofing depends on what is under or behind the tile. I am only going to address tile shower floors primarily in this discussion. Let's talk about the floor. A typical tile shower should first have a pre-slope of a dry pack mortar bed installed over the subfloor. A moisture barrier of either 15# felt or plastic (poly) is first placed on a wood subfloor primarily to prevent the subfloor from prematurely wicking moisture from the dry pack. It also is a water inhibitor to protect the wood and allows the mortar bed to move about over the subfloor (called a "cleavage membrane" or slipsheet). Pre-slope means that the floor, via the construction of this dry pack mortar bed is pitched toward the drain at the rate of 1/4" to 3/8" per foot, just like the drain and vent pipes in your home's plumbing system. A dry pack floor is constructed of sand, Portland Cement and water and is mixed to the consistency of sandcastle sand. The mortar bed should also be reinforced with metal lath or chicken wire. On top of this mortar bed should be placed the PVC shower pan liner. The application of the shower pan liner is usually the "do-or-die" step in a waterproof tile shower. Proper installation involves running the pan liner at least 6" to 7" up the walls (at least 3" higher than the curb height). 3" above the curb is so that you have room for your fasteners in the top 1" of the liner up the walls, leaving 2" above the curb without penetration all the way around the shower. You don't want any holes down near the level of the curb. The corners get folded, and can be glued behind the corners to hold the corners flat. Again, no penetration below the top inch should be allowed. I won't get into the details around the curb here except to say there should be no penetrations of the liner at the curb, and the liner should extend over the curb to outside of the shower door area. This outside area is the only area allowed fasteners. The pan liner is cut over the drain hole (carefully!). Silicone caulking is then used to bond the liner to the lower drain flange. The upper drain flange is placed over the drain bolts and tightened gently, working your way around the drain and tightening the bolts evenly as you go, not cranking one down all the way before you touch another. Do not over tighten the bolts (figure 10 foot pounds). Over tightening can warp the flange and cause a leak! There are weep holes in this drain assembly, and they must not be clogged with the caulk but must remain clear. At this point, the shower pan should be tested for leaks by plugging the drain below the level of the weep holes and filling the pan with water and letting it sit overnight. The level of water should be marked and should not change by morning. Do you see now why cracked grout should not result in water penetration to the framing, much less to the crawl space floor below the shower? It is this shower pan that ensures the waterproof ability of your tile shower construction. Over the top of this shower pan liner is then installed another mortar bed. When installing this mortar bed, it is important to use small rocks or even tile spacers to maintain air space around the weep holes of the drain so that they are never blocked/plugged by the mortar. Then, over the top of that second mortar bed is installed the tile and the grout. So, as you use the shower, most water will run across the tile and grout and will go down the drain (Remember the pre-slope mortar bed? The tile floor is thus pitched toward the drain, which is why the water runs there). Some water or vapor may penetrate the tile and grout and even the second mortar bed over the pan liner, but it is still over the pre-slope and pan liner, so it will slowly work its way to the weep hole portion of the drain and will end up in the drain and in your plumbing system. In the case of the aforementioned customer with the leaking shower, use of epoxy grout cleverly hid the problem by keeping the water on top of the tile and grout. That is because epoxy grout is vapor and water impermeable, and for the most part porcelain and glazed tile are as well. But, if that grout has any small holes or somehow cracks, the problem will return. The problem is patched, not properly solved. Diagram of a correct traditional shower pan installation:
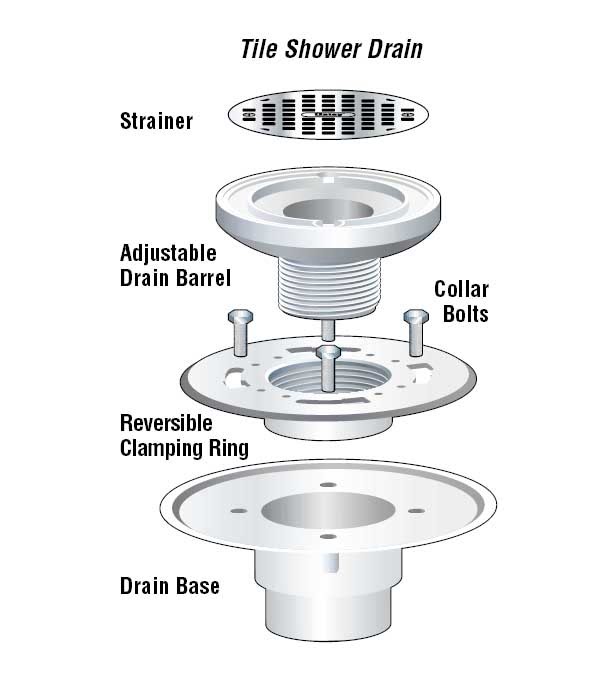
Diagram of an Oatey drain::
|