Online Blog > Previous Entry 9/24/2017 > 10/29/2017 - Foundation Waterproofing and Framing Progress > Next Entry 1/13/2018
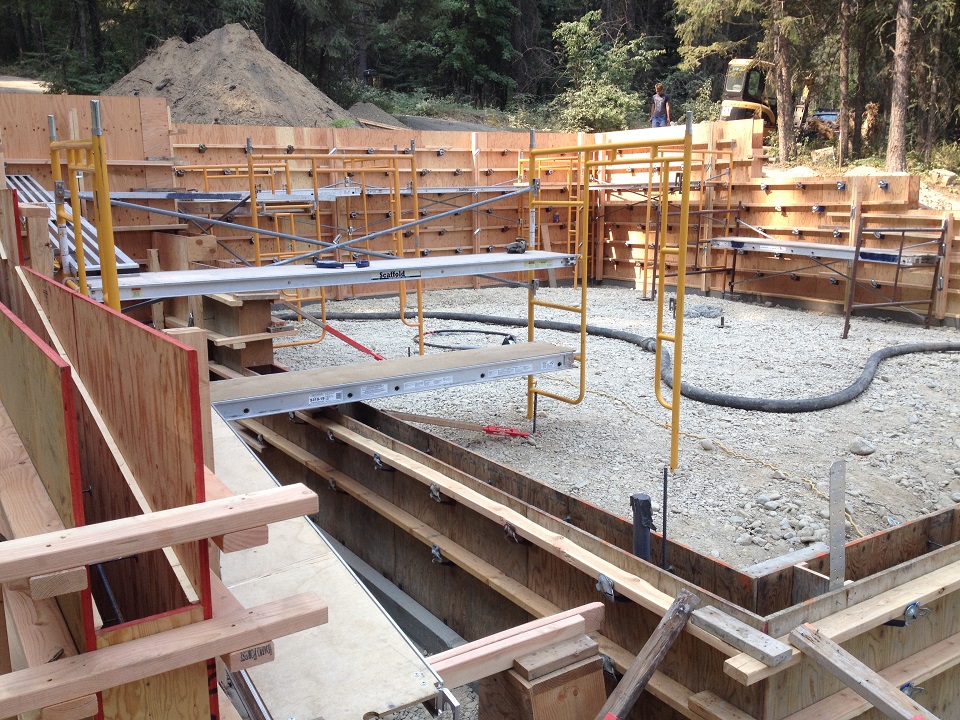
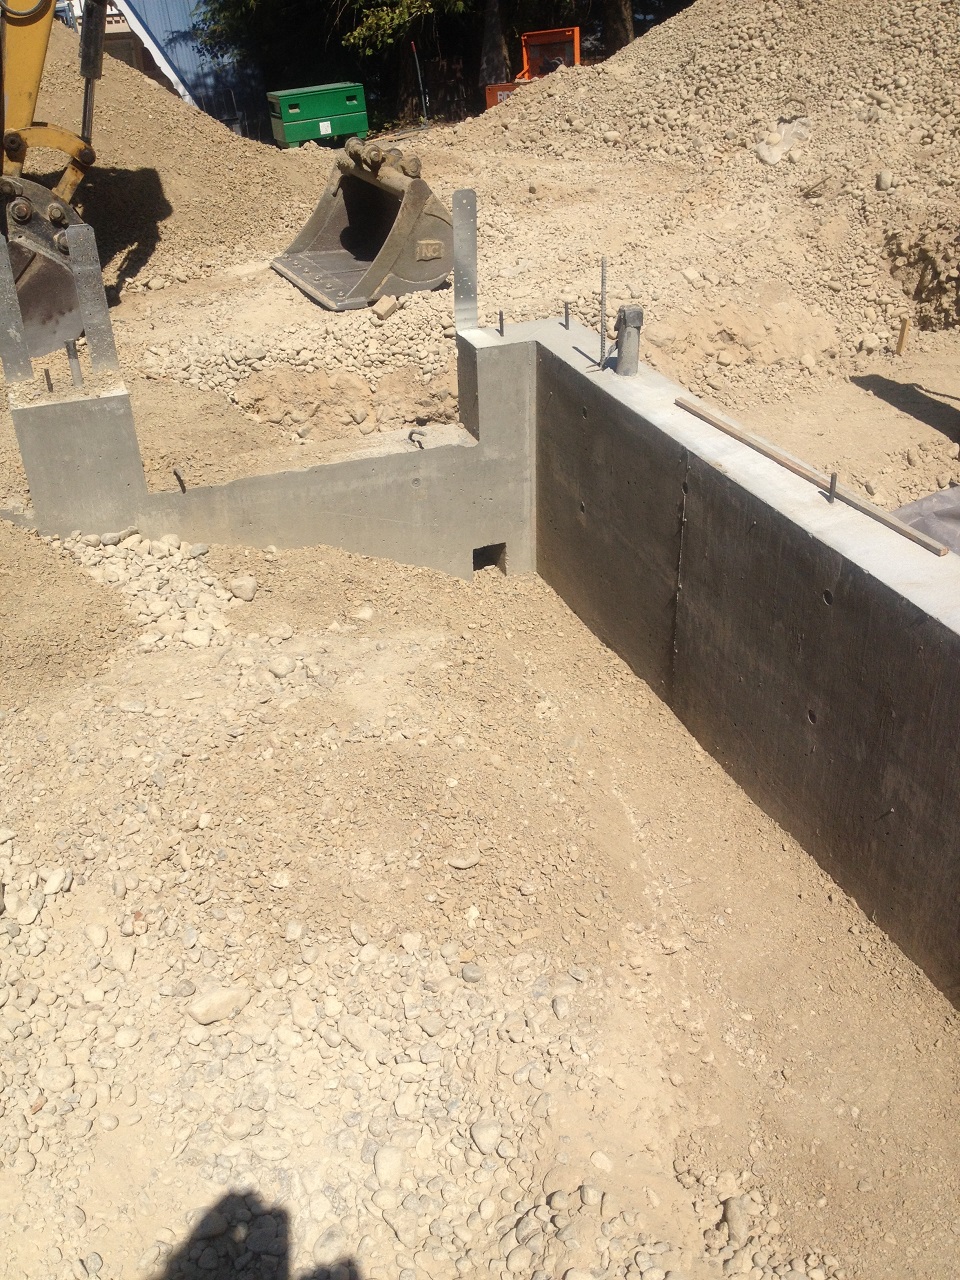
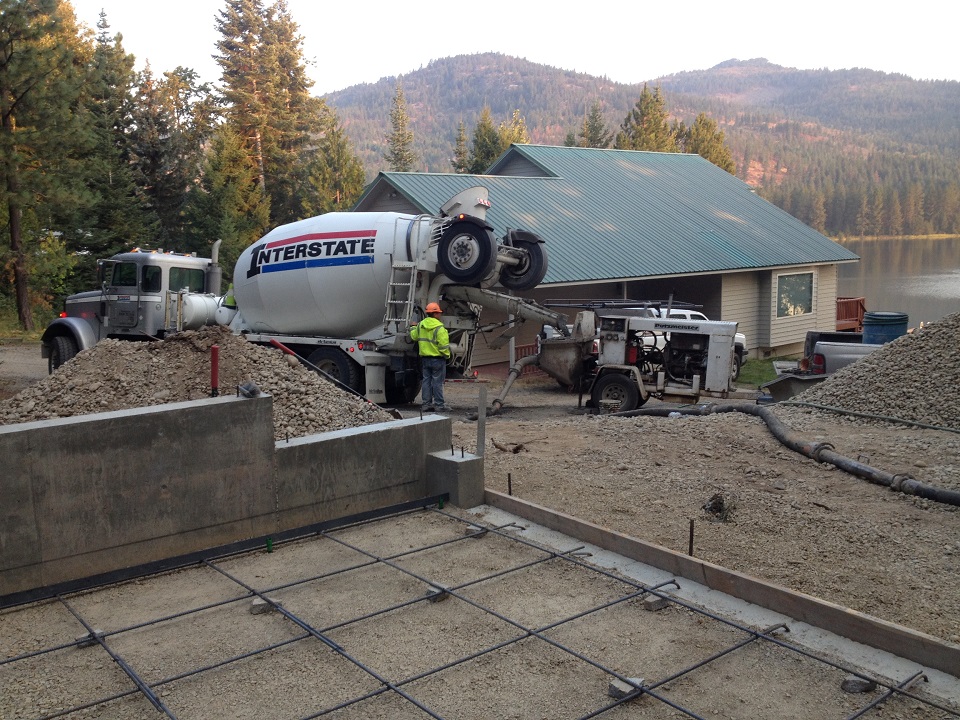
After the preliminary utility work on this riverside guest house and garage, we moved on to the excavation and the foundation. At Scott Herndon Homes, we primarily use a crew of three men, and we use numerous subcontractors. Our primary crew does the concrete work, framing, roofing, siding and all exterior and interior finish. Most of the time we even do our own excavation. The trades that we subcontract include some of the excavation, plumbing, electrical, HVAC, insulation, drywall and a significant amount of the paint and finishing. By doing most of the work with our own main crew, at each step of the way we consider the impact of what we are doing on the next stages, since it is likely our main crew is doing that stage as well. We have a wholistic view of the entire building and its constituent parts at each phase of the project. On this guest house, the slope was considerable, and the first level is designed to be a garage that will house a small shop and a boat or other vehicles. It will also have a 1/2 bath and laundry. As we layed out the excavation and access plan, we determined digging 7' deep into the hillside would be the best solution for the building relative to the remainder of the property and to getting boats and vehicles easily into and out of the new building. Since we do our own concrete, we own concrete forms of various sizes, and the next phase of the project was to form and pour the rebar reinforced footers and then to form the concrete walls on top of the footers. Because of the sloped lot, it was necessary to build a stepped footer and stepped concrete walls. Part of the foundation plan includes a sloped concrete retaining wall, but you can't very well see that in the photo below of the formwork. We do have in place various conduits and knockouts in the planned concrete for electrical and plumbing work. Since there are 8' tall walls, we pour the wall with a concrete pump in lifts of about 4' so as not to put too much pressure on the form work at one time. Basically, the pour is about 4' of the height of the wall per hour. It works out seamlessly as we pour the first lift all the way around and are ready for the second lift by the time we have worked our way around the first lift. Since it takes about an hour to pour that first lift, it is during that hour that the first lift stiffens enough to still integrate well with the second lift but to not be so liquid that it exerts tremendous force on the bottom of the forms as the second lift is applied. As we pour, we use a concrete vibrator to eliminate entrapped air in the concrete mix. Concrete is made of 4 core ingredients - portland cement, water, aggregate (rock), and sand. As it is placed, it can contain up to 20% entrapped air, and the vibrator helps eliminate much of this air from the mix and helps consolidate the mix. Concrete vibration can improve the compressive strength of the concrete by about 3% to 5% for each percent of air removed. Vibrating concrete allows the concrete to flow into corners, around rebar and flush against the form face. This eliminates voids (honeycombing) and brings paste to the surface to assist in finishing. Since concrete flows better with vibration, the mix can contain less water, thereby providing greater strength for the finished product. The following photo shows our forms ready for the pour:
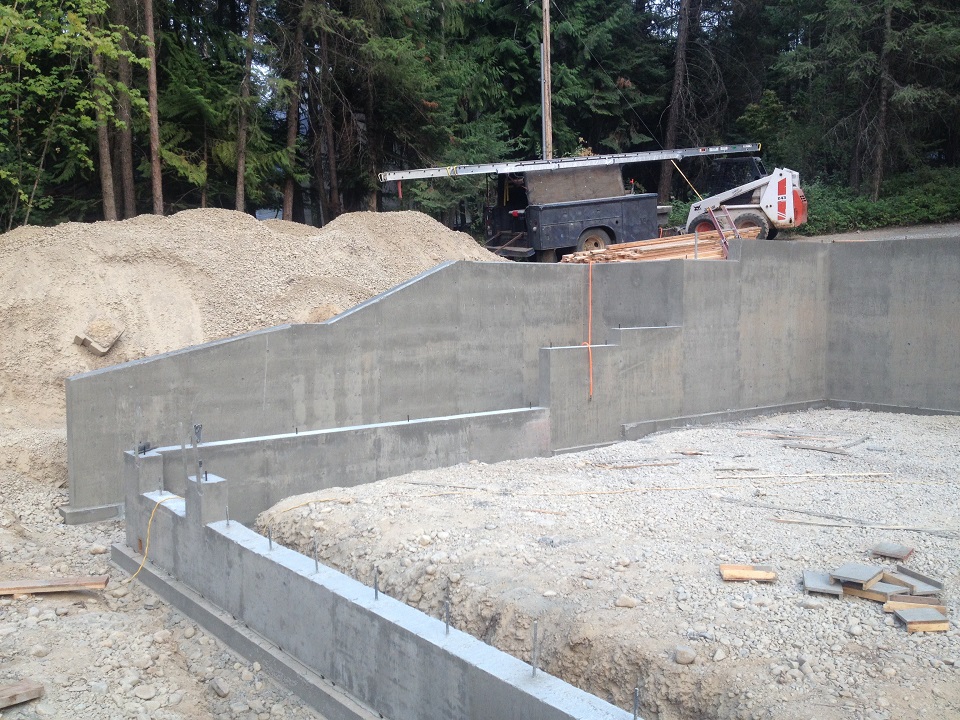
In the next two photos, you can see the completed foundation, including the sloped retaining wall, which also has bolts for post bases that will support a covered exterior stairs on this building. If you look closely, you can also see bolts, straps and conduits sticking out of the concrete - bolts and straps to secure the framing to the walls, and conduit for three way light switching to another building on the property, plus wire to the well pump, and there is the 2" conduit at the location of the main electrical panel to accommodate the electrical service entrance. Next to that is a piece of rebar protruding from the stem wall that is connected to the footer rebar and provides grounding for the electrical panel (called the Ufer ground). At the front of the below photo, the concrete wall is poured shorter, called a blockout, for the 20' wide roll-up door and for the man door. The rebar in these blockouts will be bent over and tied into the slab rebar:
In the below photo at the front wall, lower-left, you can see a wood framed penetration in the concrete that is for the 4" ABS building drain that will connect this building's plumbing to the sewer:
The next step on this building is to prepare for the slab to be poured. First, access has to be gained to the interior so that we can place the vapor barrier under the slab and place and compact crushed stone to act as the base for the slab. Therefore, we put our usual asphalt damp-proofing on the below grade portion of the front stem wall, and we place a filter fabric and 4" PVC perforated drain pipe for a french drain. We will put clean drain rock around this pipe, and the filter fabric will keep the pipe from becoming clogged with dirt and fines. The pipe will run to daylight and will keep below-grade hydrostatic pressure (from water) from building against our concrete walls.
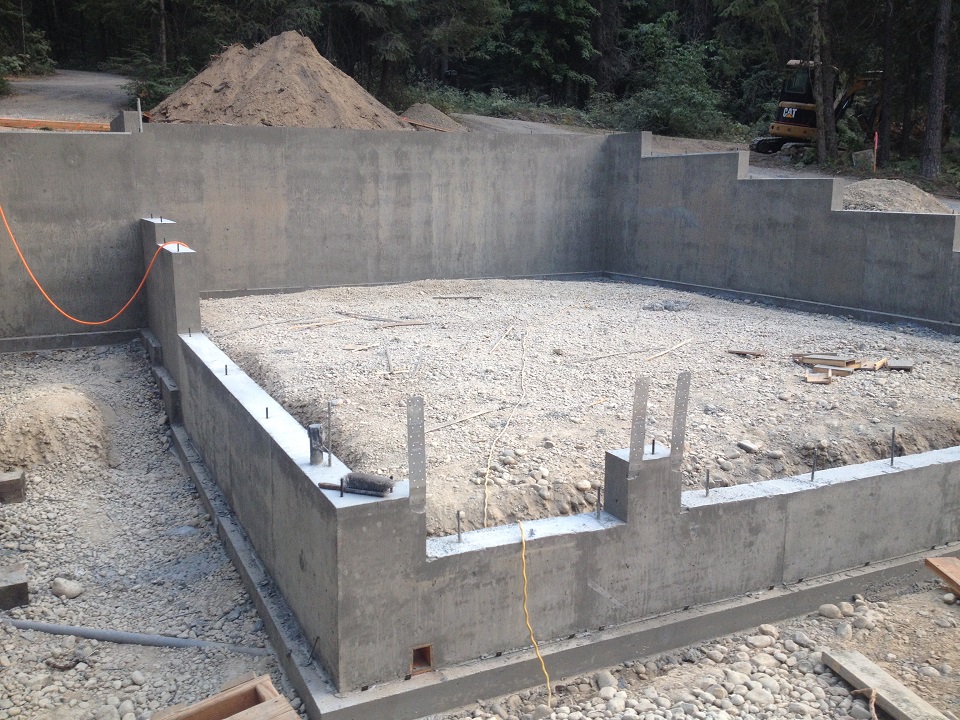
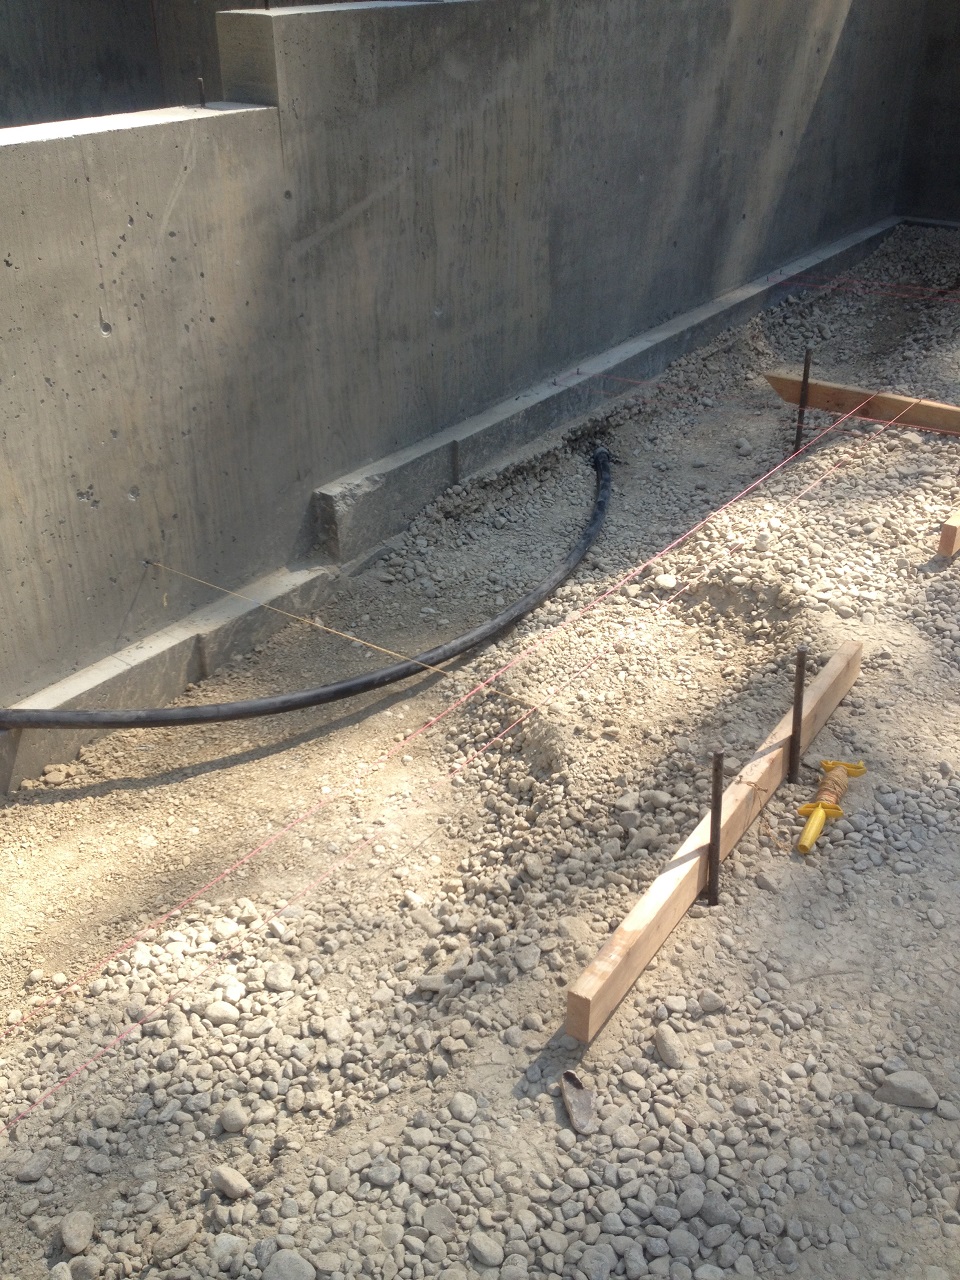
In the below photo, we have excavated so that our plumber can install the building drain pipe for all of the plumbing fixtures in the building. We will then compact crushed stone as backfill over this carefully installed pipe, and on top of that we will prep and pour the slab. In the photo, you can see that square knockout in the concrete wall for the drain pipe to exit the foundation:
To assist our plumber, we have set some string that marks inside walls on the slab that he can use for pipe stacks from the second floor and to place cleanouts and vent pipes for the fixture on the first floor. In the photo can be seen the 1 1/4" 250 PSI black polyethylene pipe that brings water supply into the building through a sleeve we previously placed under the concrete footer for just this purpose.
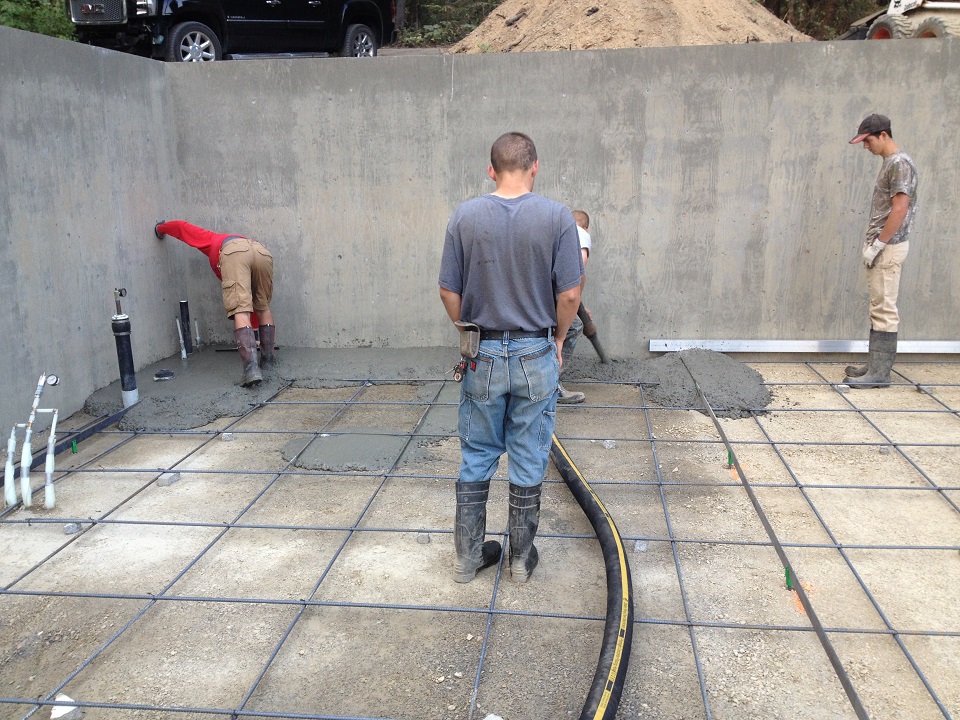
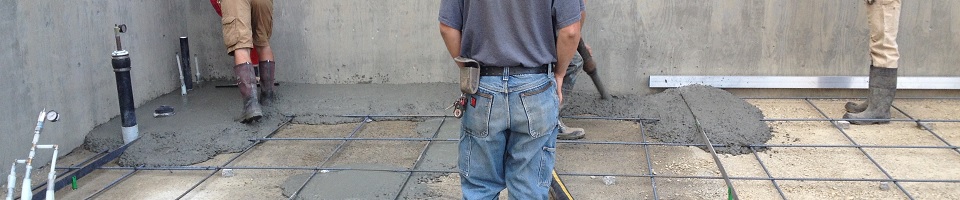
After the plumbing and supplies are installed, we compact crushed stone backfill on top of a plastic vapor barrier. By compact, I mean we place the small stone in 6" lifts, mix it with a little moisture and run a vibratory plate compactor over it, and we screed it and use a laser level to get it close to perfectly flat and matching whatever grade of the concrete we plan. On top of this compacted and flattened stone surface, we build the 1/2" rebar grid that acts as our reinforcement in the concrete slab itself. In this building, the back half of the garage will be poured level, and the front half will slope 2" toward the large roll-up door. That is so any snow, ice or water that comes into the building on vehicles will drain toward the door of the building. We use a laser level and place flattened steel screeds into the area of the pour (they actually sit on chairs driven into the ground before we pour - you can see these flat steel screeds on the green plastic chairs in the photo below), and the steel screeds end up getting temporarily buried in the liquid concrete as we pour. You can see in the photo an aluminim screed board that looks like a 2x4 at the back right - we run that across the steel screeds to level the concrete pour. Once the concrete is poured and leveled, we are able to pull the flattened steel screeds out of the wet concrete and re-use them on the next job. The green chairs remain buried in the concrete slab permanently.
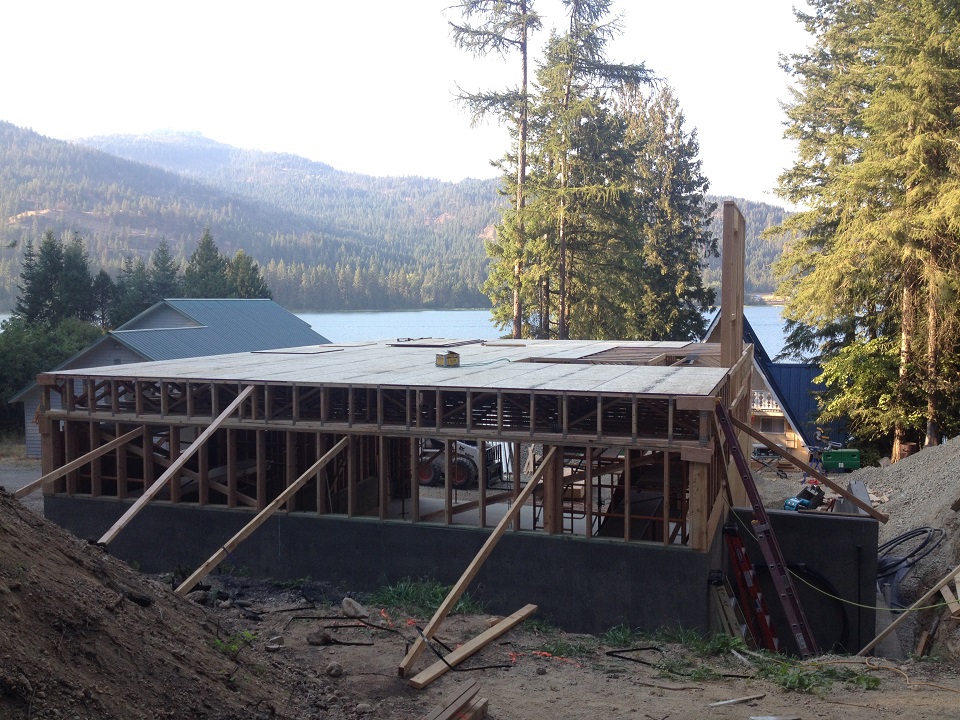
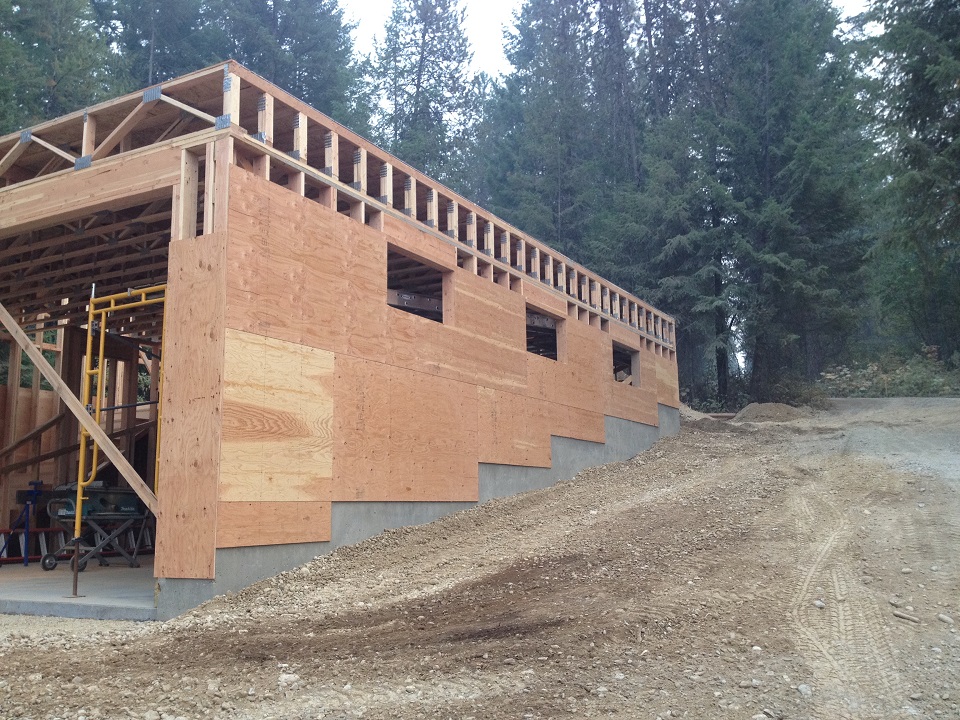
Once the slab is completed, we will frame up the first level in order to tie all of the concrete walls together and strengthen them against backfilling. In the case of this building, that means we need to complete the first floor wall framing and the floor of the 2nd floor above in order to brace the concrete walls against backfilling. Concrete takes 28 days to cure to 90% of its final strength, and even at that, though the reinforcing steel provides the strength in the walls themselves to resist lateral forces (concrete itself is great for its compressive strength - that is, loading from the top), green concrete (not fully cured) will bend under backfill stress without a frame to resist it. So, no matter which type of building we are building, we always complete the floor platforms on top of the concrete walls before backfilling:
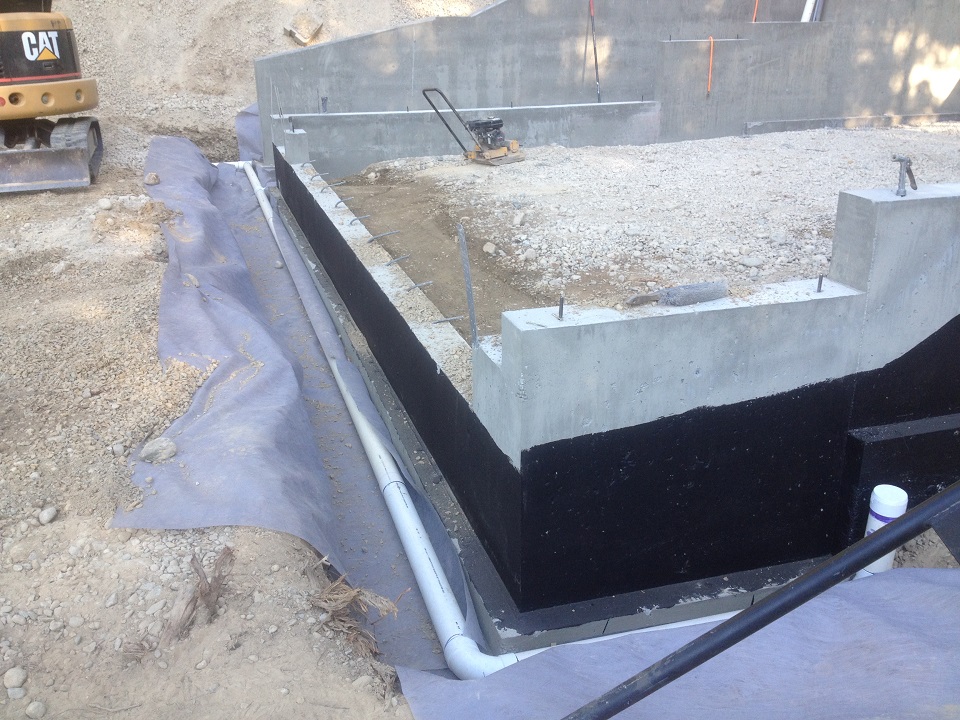
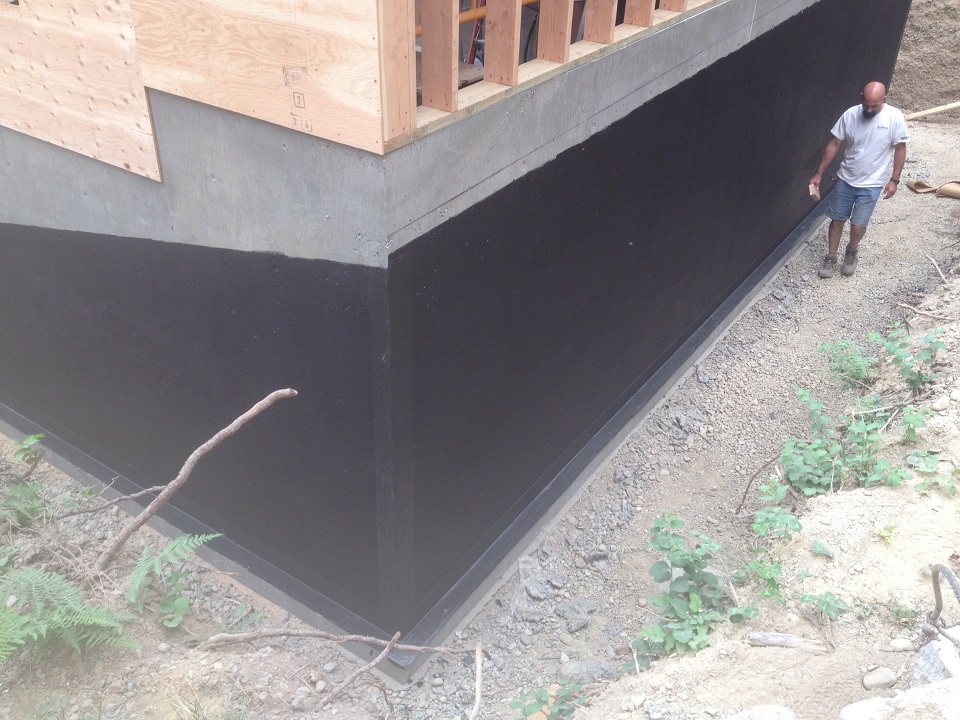
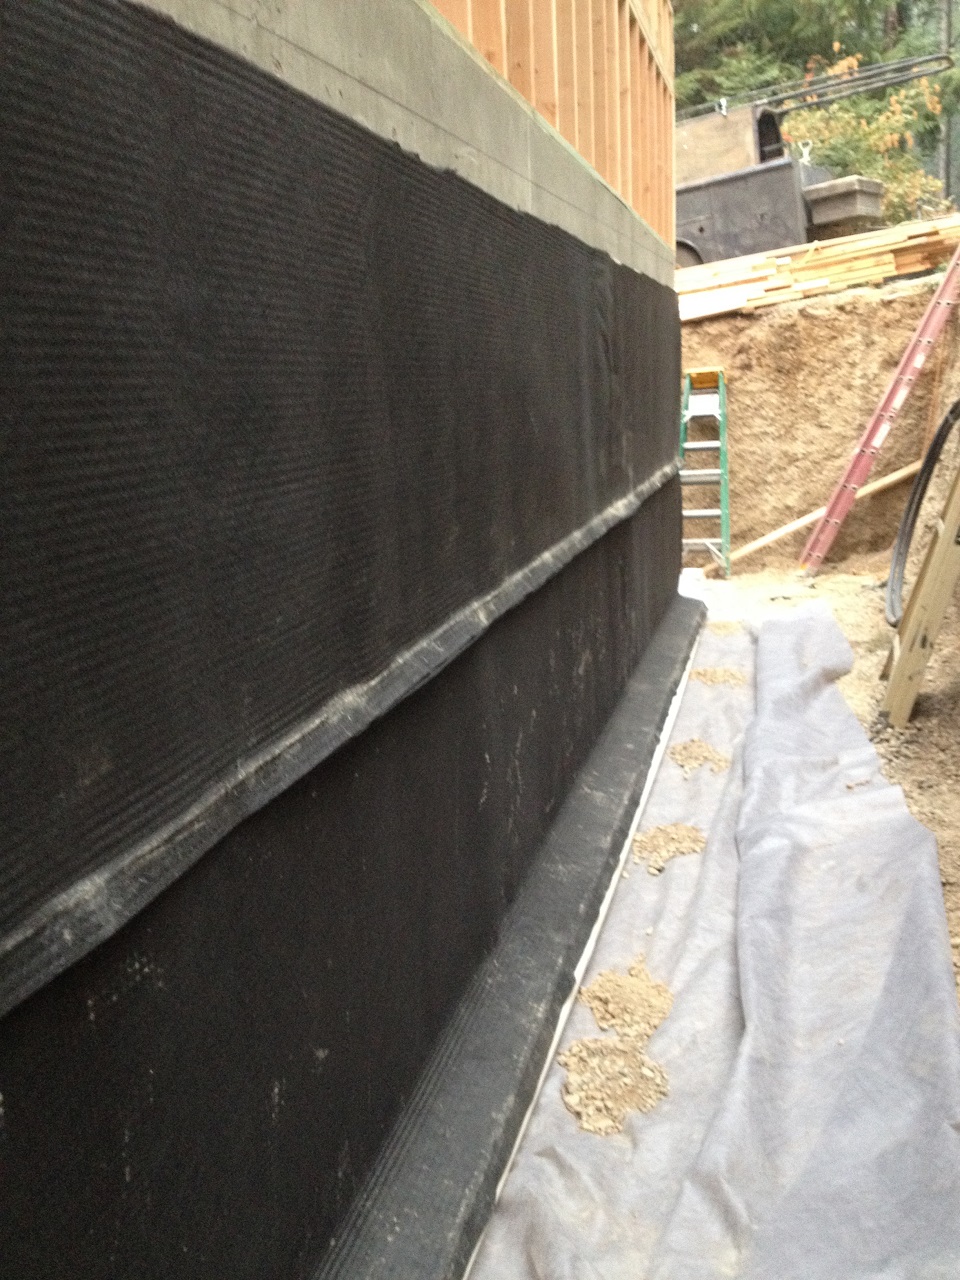
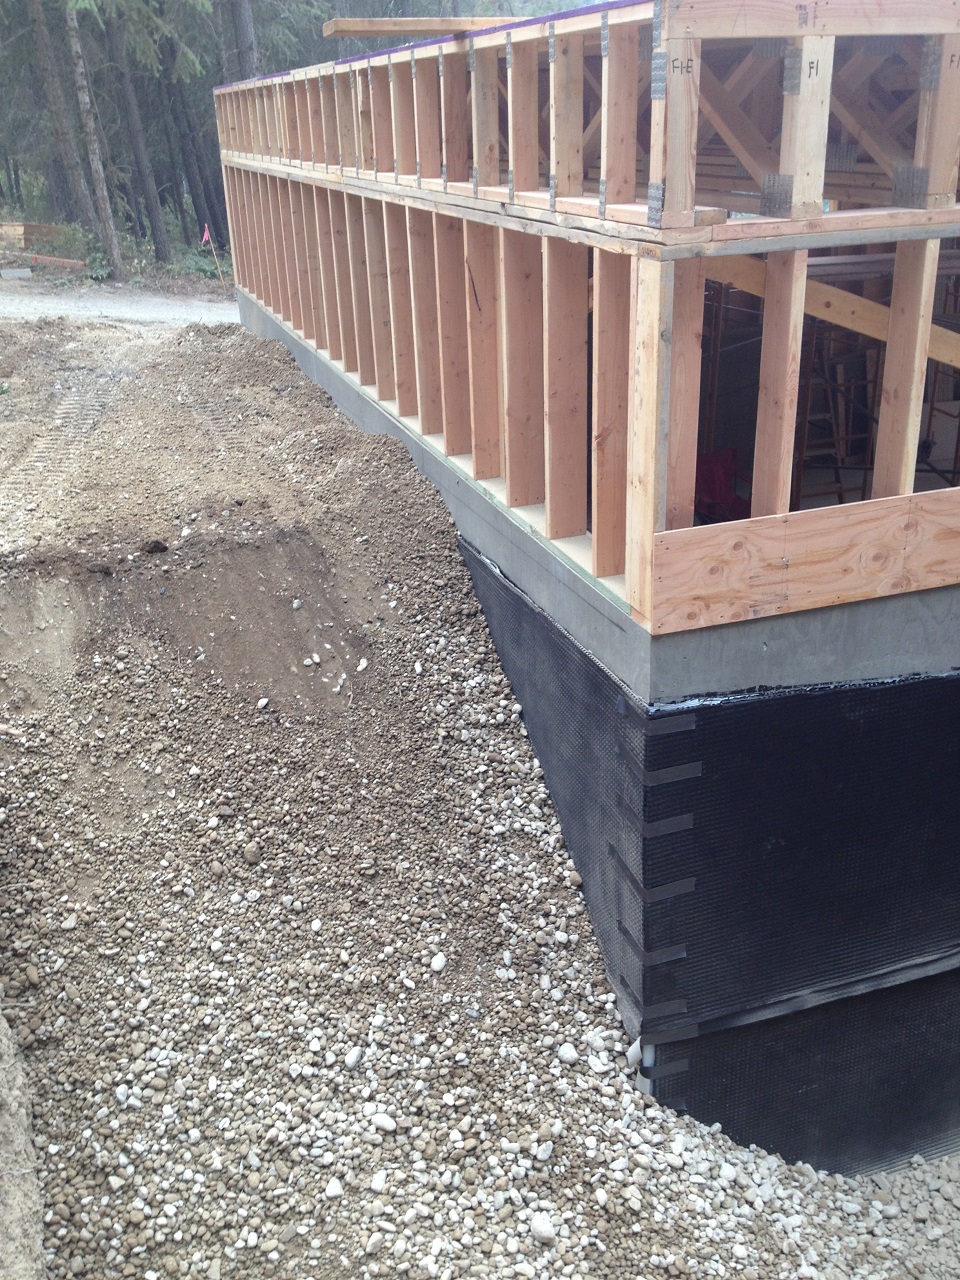
Since the concrete walls on this foundation are true basement walls, we want to fully waterproof them and not just "dampproof" them like we do on crawlspace foundations using asphalt emulsion. The product we chose for waterproofing this foundation is by WR Meadows and is called Mel-Rol. It is a self adhering 56 mm thick polymeric waterproofing membrane. It comes in 3' wide rolls and is self adhering with a release paper to expose the sticky side. Waterproofing is achieved by 2 1/2" overlaps of the courses. To prepare the concrete for the waterproofing, we first pressure wash the concrete to clean debris, and we remove any chunks of concrete or steel snap ties (a product used for the wall pour to hold the wall forms together and resist the pressure of the liquid concrete) that would damage the waterproofing membrane and compromise its integrity. Then, WR Meadows has a primer, or the company recommends its own Sealmastic Type II brush grade dampproofing as a primer, which is what we used on the walls of this project as seen in the photo below. The Sealmastic Type II rolls on with a paint roller and is sold in 5 gallon buckets:
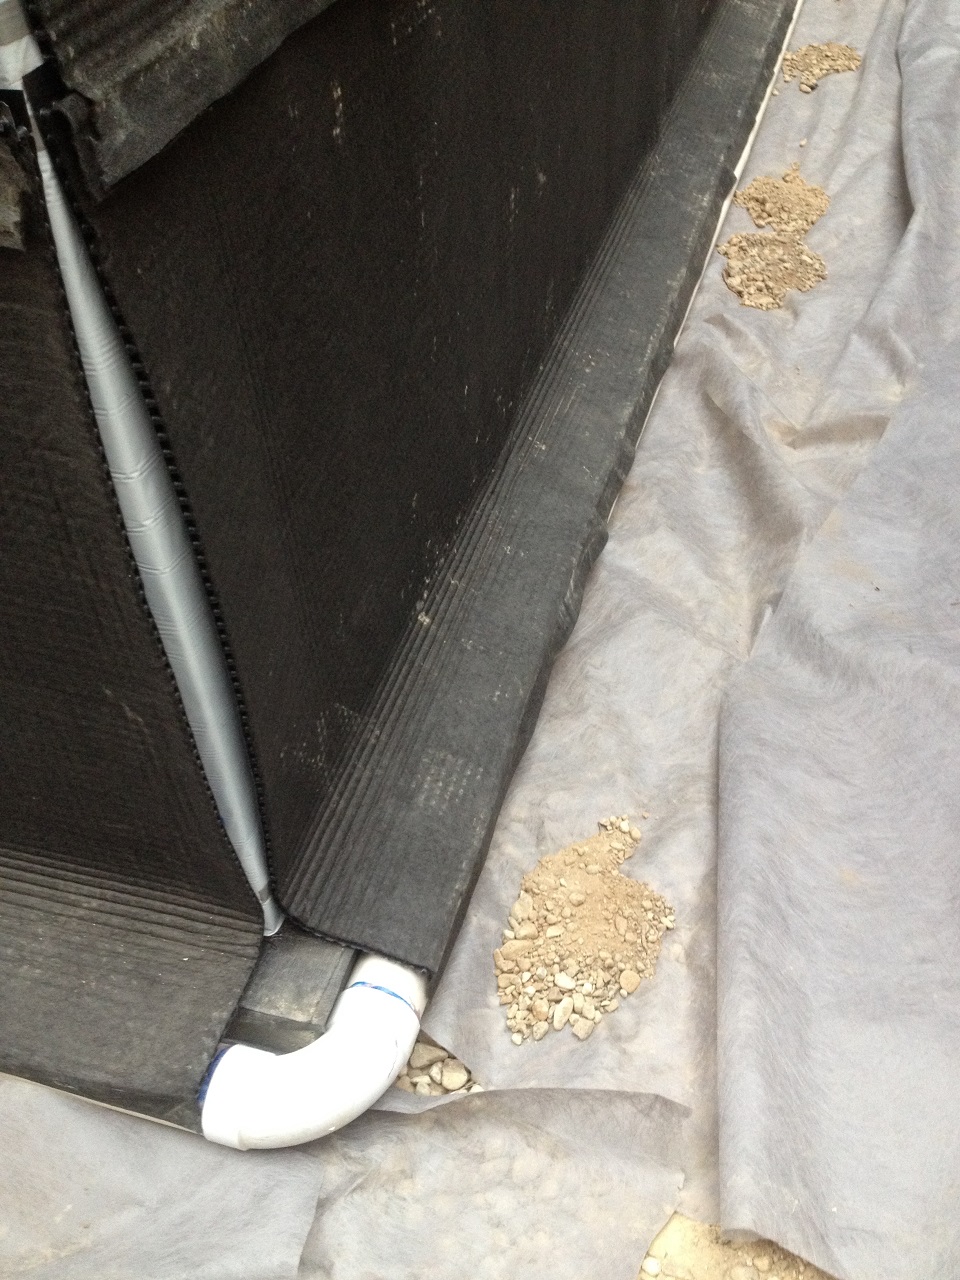
After the Sealmastic dried within an hour, we applied WR Meadows Detail Strip to the footer to wall transitions (basically that is a joint in the concrete that needs extra attention, and the Detail Strip is designed to apply to these joints). The Detail Strip comes in rolls that are less than 12" wide and easy to manage. It self adheres, and we also applied it to the inside and outside corners. Then, we installed the Mel-Rol waterproofing right away, and at its top termination on the wall, besides the self adhering backing, we used a product called Pointing Mastic, which can be dispersed from a subfloor adhesive gun, and it acts as a good glue for the top of the roll to seal it more particularly to the wall there. In the photo below, at the outside corner you can see the white Mel-Rol wrapping the corner and actually applied over the Detail Strip there, and then most visible in the photo is the next layer in the installation is the Mel-Drain. This is a 4' wide roll of drain board. Basically, it is a plastic product that is installed on top of the Mel-Rol and acts as a space after the backfill wherein water that would otherwise come up to the below-grade concrete wall of the building has a channel down the sidewall where it ends up in the footer french drain, which can be seen at the corner in the photo below. The Mel-Drain has a filter fabric that keeps the backfill dirt and fines from plugging up the drain channels, and installed horizontally as below, it is installed so that the top sheet overlaps the bottom sheet. Its whole purpose is to route water and relieve hydrostatic pressure against the wall. The Mel-Drain laps over the footer and drops draining water literally right on top of the perforated french drain pipe, barely seen in the photo. As usual, we install a filter fabric and clean drain rock around this perforated drain pipe so that it has a very long service life, and we ultimately route it to daylight.
Finally, comes the backfill against the Mel-Drain. On this job, much of the excavated material was round rock with some clay and fines, which is what we are using as the primary backfill material:
We'll let this backfill settle over the next few months we are on this job and then once it does, we will complete the final grading. In our next blog entry, we will discuss the framing details on this riverside guest house and garage. |